How to develop Liferay portlet using Eclipse
I have written this blog because the portlet development environment of LifeRay is not easy to setup. I am hoping, this blog will help beginners to develop portlet using LifeRay SDK.
Step by Step process:
We have to download 5 components, they are:
LifeRay with Tomcat bundles:

ANT 1.7.x
Download ANT tool. The version should be avove 1.7, otherwise it will not work with LifeRay. Put your ANT directory file path in your "Environment Variable". Add ANT_HOME as variable name and your ant directory file path (e.g: c:\ant\) as variable value.
LifeRay Source
Unzip the LifeRay source in the LifeRayPortal directory. Open CMD window (Windows Command Prompt) and go to the liferay portal source directory. Type the following ant command and hit enter:
LifeRay Plug-in SDK:
LifeRay plug-in sdk creates LifeRay specific portlet stub, as a result you don't need to worry about LifeRay specific xml files and directory structure. However, according to the LifeRay documentation, LifeRay is compatible with Portlet 2.0 standard. I am not sure about this LifeRay's statement, you may try with Portlet 2.0 standard and import to LifeRay to test whether Portlet 2.0 is working without creating LifeRay specific xml files and directory structure or not.
 Anyhow, go the LifeRay SDK directory and copy the "build.properties" file and paste it in the same directory. Rename it, according to the computer name. For example, my computer name was "laptop" so I renamed it as "build.laptop.properties"
Open the build.{yourcomputername}.properties file and search "app.server.dir" word. It is property key. Change the value of "app.server.dir" key according to the Liferay's tomcat path. For example, my path was c:\LifeRayPortal\liferay\tomcat
Close the build.{yourcomputername}.properties file and open the CMD window and go to the protlets directory which is inside the SDK. Type following command and hit enter:
create "hello-world" "Hello World Title"
"create" command will create the portlet stub where portlet name will be "hello-world-portlet" and portlet title will be "Hello World Title"
Now go to your portlet directory from CMD window (hello-world-portlet). Type the following ant command:
Eclipse:
Step by Step process:
We have to download 5 components, they are:
LifeRay with Tomcat bundles:
- At first, we will create a directory as LifeRayPortal. Download LifeRay with Tomcat 6.x. Unzip it inside the LifeRayPortal. In this tutorial, we will unzip all LifeRay components in the LifeRayPortal directory
- Go to the webapps directory of tomcat. If you see sevencogs-hook and sevencogs-theme directories, please delete those directories.

ANT 1.7.x
Download ANT tool. The version should be avove 1.7, otherwise it will not work with LifeRay. Put your ANT directory file path in your "Environment Variable". Add ANT_HOME as variable name and your ant directory file path (e.g: c:\ant\) as variable value.
LifeRay Source
Unzip the LifeRay source in the LifeRayPortal directory. Open CMD window (Windows Command Prompt) and go to the liferay portal source directory. Type the following ant command and hit enter:
- ant all
LifeRay Plug-in SDK:
LifeRay plug-in sdk creates LifeRay specific portlet stub, as a result you don't need to worry about LifeRay specific xml files and directory structure. However, according to the LifeRay documentation, LifeRay is compatible with Portlet 2.0 standard. I am not sure about this LifeRay's statement, you may try with Portlet 2.0 standard and import to LifeRay to test whether Portlet 2.0 is working without creating LifeRay specific xml files and directory structure or not.
 Anyhow, go the LifeRay SDK directory and copy the "build.properties" file and paste it in the same directory. Rename it, according to the computer name. For example, my computer name was "laptop" so I renamed it as "build.laptop.properties"
Open the build.{yourcomputername}.properties file and search "app.server.dir" word. It is property key. Change the value of "app.server.dir" key according to the Liferay's tomcat path. For example, my path was c:\LifeRayPortal\liferay\tomcat
Close the build.{yourcomputername}.properties file and open the CMD window and go to the protlets directory which is inside the SDK. Type following command and hit enter:
create "hello-world" "Hello World Title"
"create" command will create the portlet stub where portlet name will be "hello-world-portlet" and portlet title will be "Hello World Title"
Now go to your portlet directory from CMD window (hello-world-portlet). Type the following ant command:
- ant setup-eclipse
Eclipse:
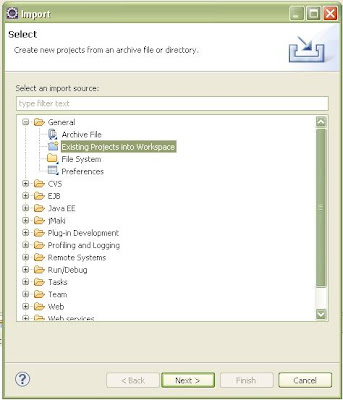
- Click File from the menu and click import (File--->Import) and Select "Exiting Project into Workspace" and locate your hello-world-portlet. After importing it, you will see hello-world-portlet in the Project Explorer window of the Eclipse

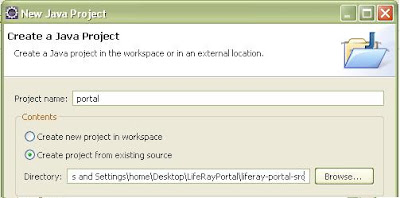
- Click File again and we will create new java Project (File--->New--->Project). Now select Java Project and click Next.

- Project name should be "portal" otherwise your portlet will not be compiled. Select the "Create project from exisiting source" radio button. So you will locate your LifeRay source directory
- Now click Finish. It will take few minutes.
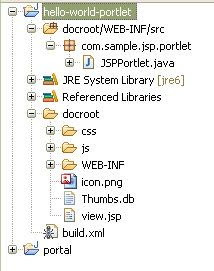
- Go to the Project Explorer of Eclipse and open the hello-world-portlet project. You will see the following directory structure:

- You have build.xml and view.jsp. These two files are very important because using build.xml you will compile the portlet code, using Eclipse Ant plug-in and view.jsp file is the main entry page of your portlet
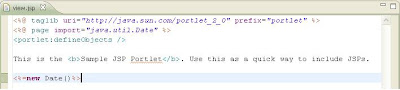
- Open the View.jsp page and delete the comment
- Now we will use plain jsp code. Like, we will import java.util.Date package and add the following jsp code: <%=new Date()%>. So our portlet will display current date and time

- From Eclipse Ant plugin run the build.xml file to compile the portlet. You will get Build successful message if there is no java code error.
- Now go to the depoy directory of liferay which is inside the LifeRayPortal directory. You will see hello-world-portlet.war file. Go to the tomcat's bin directory of liferay and click start-up.bat file to start the tomcat container.
- Open the browser and type the following address: http://localhost:8080/
- You will see LifeRay login page and type "test@liferay.com" as email address and "test" as password. We can change the email address and password later.
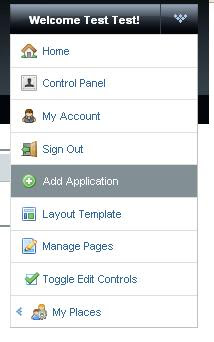
- Click Welcome Test Test! drop down list box. It is called Dock. So we will call it Dock also. Go to the Add Application menu item and click it.

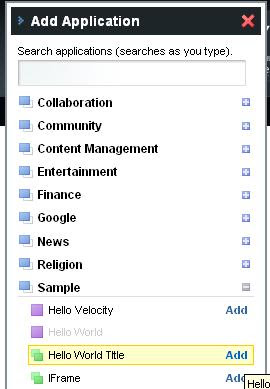
- Add Application menu item will open the following Dialog box. Click "Sample" and you will see your portlet.

- Click "Add" link next to your portlet which will add your portlet on the portal page.

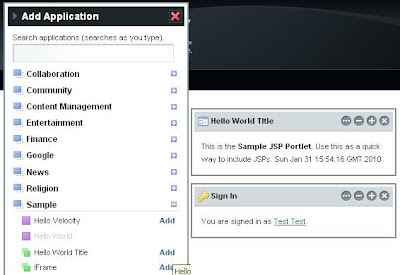
- Congratulation!!! your portlet is on the portal page with current date and time.
Its nice dear
ReplyDeletein this tutorial, you use elcipse galileo.
ReplyDeletecan I use Eclipse indigo? If can, how I add liferay src in project "portal"
thx
I am new to Liferay and I need to develop a custom widget in Liferay The widget should have the following fields and users should be able to customize the widget to pick and choose the fields that they want to see.
ReplyDeleteProperty Name
Property Number
Property Address
Year Built
Income
Expense
CapEx
TI
LC